
Expert insights, surgical technique guides, and medical device updates from industry leaders.
Exploring advancements in joint arthroplasty, trauma management, and spinal systems.
Buying Small Fragment Locked Plates is not simply a matter of choosing the lowest price or the largest catalog. These implants must match fracture geometry, bone quality, surgical access, and the planned fixation strategy. A plate that looks suitable on a product page may feel too stiff, too bulky, or poorly contoured in the operating room. Small details matter, including hole configuration, screw compatibility, locking angles, plate length, and instrument reliability.
Orthopaedic trauma expert Dr. William M. Ricci offers a useful reminder: “The implant is only one part of the treatment.” The surgeon must also understand reduction, soft-tissue preservation, load sharing, and postoperative protection. This is why the following seven tips focus on more than specifications. They examine practical selection, manufacturing quality, documentation, and supplier support.
A good decision begins with the fracture, not the brochure. Check whether the Small Fragment Locked Plates support the intended fixation method. Review material strength, locking performance, corrosion resistance, and available screw options. Ask for evidence, not confident language. Certifications matter, but they do not replace clinical judgment or hands-on evaluation.
There is no perfect plate. Even experienced teams can overlook an instrument mismatch or an awkward contour. That weakness deserves attention. Consider trial fitting, surgeon feedback, and compatibility with existing systems before purchase. Reliable suppliers should provide clear technical files, traceability, sterilization information, and responsive assistance. These seven tips will help buyers compare products carefully, identify hidden risks, and make a more defensible choice for real surgical demands.
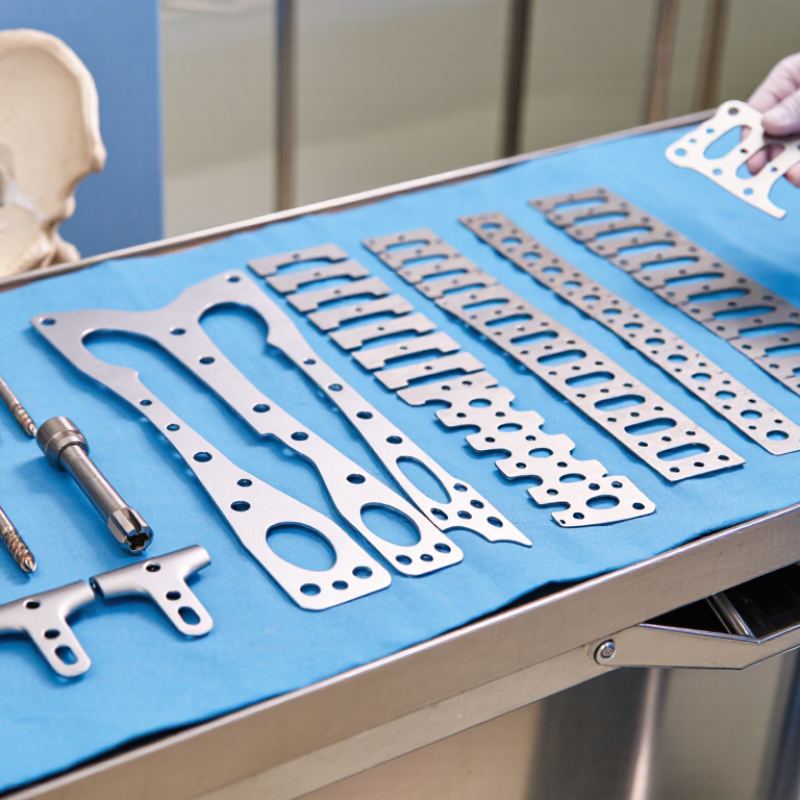
Selecting a small fragment locked plate starts with the fracture pattern, not the catalog page. A 2.0 mm plate may suit tiny periarticular fragments, while a 2.7 mm plate can provide greater stiffness for larger fragments. The difference matters. Review radiographs and CT images when available. Identify fragment size, bone quality, joint involvement, and the planned screw direction. A plate that looks suitable on one view may fail to capture the opposite fragment.
Think beyond diameter. Plate length, hole spacing, contour, and screw options must fit the anatomy. In thin bone, excessive plate bulk can irritate soft tissue. In osteoporotic bone, a very small construct may offer limited support. Locked screws improve angular stability, but they do not replace accurate reduction or adequate fixation points. More screws are not automatically better.
A simple rule can mislead.
During purchasing, compare the system’s smallest available plate with real surgical scenarios. Ask whether the 2.0 mm option accepts enough screws around the fracture. Check whether the 2.7 mm plate can be contoured without weakening its locking holes. Consider instruments, drill guides, screw lengths, and backup sizes. These details are easy to overlook. Surgeons should also review handling feedback from actual cases, because laboratory specifications cannot show every clinical difficulty. Sometimes the ideal plate is not the smallest one, but the one that captures the fragment without obstructing reduction.
Small fragment locked plates deserve careful comparison, especially when choosing fixed-angle or 15° variable-angle systems. Tip one: define the fracture pattern before reviewing plate features. Fixed-angle holes provide predictable screw paths and strong support near a simple fracture. They can be reassuring. However, they may limit screw placement around a joint or narrow fragment.
Tip two: check whether the 15° variable-angle range matches your planned trajectory. This flexibility can help avoid an existing screw, target a fragment, or improve purchase in irregular bone. Tip three: confirm the system’s locking strength at different angles. A wider range is not automatically better. Tip four: inspect the screw head and plate interface closely. Smooth engagement matters during insertion. Tip five: choose plates with low profiles and rounded edges, particularly where soft tissue coverage is limited. In practice, prominent hardware can become a patient complaint, even after good fracture healing.
Tip six: evaluate the instruments, not only the plate. Clear guides, reliable torque control, and simple depth measurement reduce avoidable errors. Tip seven: review clinical evidence, sterilization instructions, and compatibility with available screws. These details are easy to overlook. They should not be. Variable-angle systems may improve positioning, but excessive freedom can weaken decision-making when the surgeon lacks a clear plan. Fixed-angle designs may be less adaptable, yet their consistency can support efficient procedures. The better choice depends on bone quality, fragment size, surgical access, and the team’s experience. Reassess those assumptions.
Plate fit deserves more attention than the plate label. A locked plate should follow the bone’s surface without creating pressure points. Check the contour on multiple views, not only the first fluoroscopic image. A small gap near the metaphysis may change screw direction and reduce useful fixation.
Count the holes against the fracture pattern. A short plate can leave no room for a stable working length. A very long plate may irritate soft tissue or complicate insertion. In many small-fragment cases, planning two or three screws in each major fragment provides useful stability, but this is not an absolute rule. Poor bone quality, tiny fragments, and limited cortical purchase may require a different strategy. The screw should engage solid bone, not merely fill an empty hole.
Do not over-contour blindly. Bending close to a threaded hole can distort its locking function, while repeated bending may weaken the plate. I would place the plate on the bone model or trial position, then reassess screw trajectories. A neat fit can still be mechanically wrong. On the operating table, swelling and soft-tissue tension may reveal problems hidden during planning. Leave enough holes for adjustment, but avoid treating hole count as a substitute for reduction quality. Imaging, fragment size, bone density, and the surgeon’s judgment must guide the final construct. Mistakes happen when convenience replaces measurement.
7 Tips for Buying Small Fragment Locked Plates
Verify Materials: ASTM F138 Stainless Steel or ISO 5832 Titanium
When buying small fragment locking plates, verify the material before comparing prices. ASTM F138 stainless steel is commonly selected for its strength, predictable mechanical behavior, and established implant history. Titanium must be identified by its exact ISO 5832 designation, because the standard includes several material grades. “Titanium” alone is not enough.
Tip: Request evidence, not promises. Ask for the material certificate, heat or lot number, chemical composition, and mechanical test results. The certificate should match the plate’s packaging and traceability records. In practice, mismatched paperwork can create unnecessary questions during clinical review. I have learned that attractive documentation may still omit the exact standard part.
Consider the operating environment. Stainless steel can provide strong resistance to bending, while titanium offers lower density and generally produces less imaging interference. However, handling marks, surface damage, and poor cleaning can affect performance regardless of the alloy. Check the locking thread, plate contour, hole geometry, and surface finish under suitable inspection equipment. Also confirm compatibility with the intended screws and instruments. Small details matter.
Tip: Review corrosion and quality controls. Ask whether the manufacturer performs passivation, surface inspection, dimensional checks, and batch release testing. Independent laboratory reports can strengthen confidence, but they should remain current and traceable. Do not assume a familiar material guarantees perfect results. A careful buyer examines the evidence, questions unclear claims, and involves qualified clinical and quality professionals before purchase.
| Tip | Buying Dimension | What to Verify | Relevant Technical Considerations | Recommended Evidence |
|---|---|---|---|---|
| 1 | Confirm the implant material | Check whether the plate is manufactured from stainless steel compliant with ASTM F138 or titanium compliant with the applicable ISO 5832 material specification. | ASTM F138 covers wrought 18 chromium–14 nickel–2.5 molybdenum stainless steel for surgical implants. ISO 5832 is a series of standards; the exact part should be identified, such as ISO 5832-2 for unalloyed titanium or ISO 5832-3 for titanium alloy commonly designated Ti-6Al-4V. | Material certificate, heat or lot number, standard designation, chemical composition, and mechanical-property report. |
| 2 | Match plate geometry to the fracture | Review plate length, width, thickness, hole count, hole spacing, contour, and anatomical shape for the intended small-fragment indication. | Adequate plate length and balanced screw distribution can help provide stable fixation. The plate should permit appropriate positioning without unnecessary prominence or excessive soft-tissue irritation. | Dimensioned drawings, tolerance tables, anatomical indication list, and surgical technique documentation. |
| 3 | Verify the locking interface | Confirm that the locking screw head and plate hole thread or locking mechanism are specifically designed to work together. | A locked construct depends on correct thread engagement, compatible screw dimensions, proper insertion instruments, and the specified tightening technique. Do not assume that components from different systems are interchangeable. | Compatibility matrix, screw and plate technical drawings, validated instruments, and documented torque recommendations where applicable. |
| 4 | Compare mechanical performance | Evaluate bending strength, bending stiffness, torsional resistance, fatigue performance, and locking-hole durability using standardized test methods. | Performance depends on alloy, plate cross-section, hole design, surface condition, screw configuration, and loading environment. A higher stiffness is not automatically better for every fracture pattern. | Bench-test reports, fatigue-test methods and results, design verification records, and clearly defined acceptance criteria. |
| 5 | Assess corrosion and surface quality | Inspect the surface for burrs, scratches, pits, sharp edges, discoloration, and residues. Confirm corrosion-control and passivation processes where applicable. | Surface defects can affect tissue interaction, cleaning, corrosion resistance, and fatigue behavior. Stainless steel and titanium require appropriate processing and handling to avoid contamination or damage. | Inspection criteria, surface-finish specifications, passivation or cleaning validation, and corrosion-related test documentation. |
| 6 | Check imaging and material compatibility | Review radiographic visibility, MRI conditions, and compatibility with other implanted components used in the planned procedure. | The implant may create imaging artifacts. MRI safety is configuration- and condition-dependent; claims should be supported by testing and defined field strength, scanner conditions, and implant configuration. | MRI safety information, imaging-artifact assessment, patient labeling, and documented guidance for mixed-metal constructs. |
| 7 | Review sterilization, traceability, and regulatory records | Confirm whether the plate is supplied sterile or non-sterile, its shelf-life information, packaging integrity requirements, and complete lot traceability. | Reusable instruments and implantable plates may have different cleaning, sterilization, and handling requirements. Regulatory status and labeling must correspond to the intended market and use. | Instructions for use, sterilization validation, packaging validation, certificate of conformity, risk-management records, and lot-level traceability. |
Buying small fragment locked plates requires more than checking hole count or a polished catalog image. Confirm that the system supports AO/OTA fracture classification and matches the intended fragment size, bone zone, and screw trajectory. AO/OTA provides a standardized language for fracture patterns, but it does not certify implant performance. Review peer-reviewed biomechanical and clinical evidence, including fixation failure, screw pullout, and reoperation data. Ask for test methods, sample sizes, and follow-up periods. Vague evidence is a warning.
Compliance protects value. Request current quality-system certificates, material specifications, traceability records, and sterilization validation. ISO 13485 addresses medical-device quality management, while ISO 11135 or ISO 11137 may support sterilization validation, depending on the method. Check the lot label and package indicator at the receiving desk. A damaged pouch is not a small detail. WHO’s 2016 surgical-site-infection guidelines report rates commonly ranging from 2% to 15%, depending on procedure and setting, so sterility controls deserve practical attention. Review the warranty for plate breakage, screw stripping, instrument wear, and response time. “Limited warranty” can mean almost anything.
Compare the full cost, not only the plate price. Include compatible screws, trays, replacement instruments, freight, training, and revision exposure. OECD health reports repeatedly link postoperative complications with longer hospital stays and higher spending. That makes a cheaper implant less attractive if supply delays interrupt surgery. I would also inspect one plate and one screw personally. Edges, thread engagement, and driver fit reveal more than a brochure. Mistakes happen. Your procurement checklist should admit that.
Evidence-weighted verification priorities for compliance, sterility, warranty, and total value
The 100-point screening model emphasizes documented clinical or biomechanical evidence, regulatory quality systems, validated sterilization and packaging, traceability, warranty clarity, and total cost of ownership. Confirm current documentation against applicable requirements, including AO/OTA fracture classification references, ISO 13485, ISO 14971, ISO 11607, ISO 11135, ISO 11137, ISO 17665, and relevant ASTM mechanical-testing methods. Scores are purchasing priorities, not clinical performance claims.
Match the plate to fragment size, bone quality, and joint involvement. A 2.0 mm plate may suit tiny periarticular fragments. A 2.7 mm plate can provide greater stiffness for larger fragments. The smallest option is not always best.
Review radiographs and CT images when available. Check the fracture from multiple angles. One view may hide an opposite fragment. Measure fragment size and consider the planned screw direction.
No. Locked screws improve angular stability, but they do not replace accurate reduction. Each screw still needs solid bone purchase. More screws are not automatically better.
Many cases use two or three screws per major fragment. This is only a planning guide. Tiny fragments or weak bone may require another strategy. Count useful fixation, not empty holes.
A short plate may leave too few fixation points. A very long plate can irritate soft tissue and complicate insertion. Leave room for adjustment. Do not treat hole count as a substitute for reduction quality.
Place the plate on the bone model or trial position. Check the fit from several views. The plate should follow the bone without pressure points. A small metaphyseal gap can change screw direction.
Contour carefully and reassess screw trajectories afterward. Bending near a threaded hole may affect locking function. Repeated bending may weaken the plate. A neat fit can still be mechanically wrong.
Check drill guides, screw lengths, instruments, backup sizes, and available plate lengths. Confirm that the smallest plate accepts enough screws around the fracture. Laboratory specifications cannot show every handling difficulty.
Swelling and soft-tissue tension may reveal problems hidden during planning. Recheck the plate position and screw paths. I would not rely on convenience alone. Measure twice.
Choosing Small Fragment Locked Plates requires careful attention to fracture characteristics, implant design, and clinical requirements. Begin by matching the plate size to the fragment, with 2.0–2.7 mm systems generally suited to small anatomical structures. Compare fixed-angle locking plates with 15° variable-angle options, considering whether adaptable screw trajectories may improve fixation. Plate fit is also essential: evaluate contouring capability, hole count, and whether the design can support approximately two or three screws in each important fragment.
Material quality and overall value should be assessed before purchase. Confirm that stainless steel meets ASTM F138 requirements or that titanium complies with ISO 5832 standards, depending on the intended application. In addition, review available AO/OTA-related evidence, sterilization status, warranty coverage, and total cost rather than focusing only on the initial price. A well-selected plate should combine reliable mechanical performance, appropriate anatomical fit, documented quality, and practical economic value.